As a mobile developer, using a back-end as a service (BaaS) platform can help you swiftly implement your ideas. Firebase has all the key features you need for rapid prototyping and quickly testing out your ideas. Read this introduction to Firebase tutorial written by Deepthi Bhattachar.
The article, titled "Intégration et Authentification Firebase sur iOS" (Firebase Integration and Authentication on iOS), serves as a tutorial and comprehensive guide on integrating and configuring the Firebase back-end as a service (BaaS) platform within an iOS mobile application, with a specific focus on user authentication.
Here is a summary of the key content:
Firebase as a Solution for Rapid Prototyping
The article highlights that mobile applications require a back-end server for user login and data synchronization. Firebase makes it easy for developers to test out ideas quickly—an era characterized by rapid prototyping—by providing essential back-end functionality, such as authentication, database services, and object storage, thus eliminating the need for server-side coding knowledge or time. Furthermore, Firebase includes useful capabilities for prototype validation, including analytics, A/B testing, and push notifications. The service is free for small projects.
Step-by-Step iOS Integration
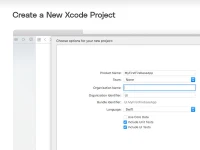
The core of the article outlines the technical steps required to set up an iOS project (named MyFirstFirebaseApp) with Firebase:
Project Setup: Creating a new Single View App Xcode project.
Dependency Management: Initializing and using CocoaPods to add the prerequisite libraries via the
Firebase/Corepod.Firebase Account Configuration: Creating an account in the Firebase Console (a Google product) and creating a new project. Although free for prototyping, the author notes the need to be aware of the pricing structure for production use.
App Registration: Registering the iOS app, downloading the essential
GoogleService-Info.plistfile (which contains basic configuration information like client ID, API Key, and database URL), and adding it to the Xcode project.Initialization: Adding the initialization code (
import FirebaseandFirebaseApp.configure()) to theAppDelegate.swiftfile to ensure Firebase is correctly set up when the app launches.
User Authentication and Management
The article details the various user management and sign-in options available through the Firebase Dashboard's Authentication section, where developers can choose one or multiple methods:
Standard Methods: Email/Password, Google, Facebook, Twitter, GitHub, and Anonymous guest accounts.
Phone Authentication: Allows sign-in using a mobile phone number, with Firebase SDK tools for verification. This method is free for the first 10,000 logins per month under the free Spark plan.
Implementing Phone Authentication
The tutorial dedicates significant attention to configuring and implementing Phone Authentication in Swift:
Configuration: Requires enabling Phone authentication in the Firebase Console and including the
Firebase/Authpod.Push Notifications and reCAPTCHA: It necessitates enabling push notifications in the Xcode project. It also requires configuring reCAPTCHA verification (using the
REVERSEDCLIENTIDin the Xcode URL Schemes) as a fallback mechanism if silent push notifications cannot be received (e.g., when using an iOS simulator or if background refresh is disabled).Cloud Messaging Setup: The tutorial includes instructions for configuring Firebase Cloud Messaging (FCM) by uploading APNs certificates and the APNs authentication key to the Firebase Console.
Code Implementation: The provided Swift code utilizes
RegistrationServiceto callPhoneAuthProvider.provider().verifyPhoneNumber, which sends a One-Time Password (OTP) to the user's phone. Upon receiving averificationID, the app prompts the user to input the OTP via an alert dialog. Finally, thesignInmethod creates a Firebase credential using theverificationIdand the OTP, completing the user sign-in process.
You may also be interested in ...

Axentix

A Modern CSS Reset